2.0 텍스처에 렌더링하기
이 장에서는 2D 기법을 탐구할 것입니다. 3D API를 사용하여 왜 2D에 중점을 두는지 궁금할 수 있습니다. WebGPU는 2D 처리를 가속화하는 데 매우 효과적이라는 것이 밝혀졌습니다. 응용 분야에는 이미지 및 비디오 처리, 사용자 인터페이스 등이 포함됩니다. 따라서 우리는 몇 가지 기본적인 2D 관련 주제를 다루고자 합니다.
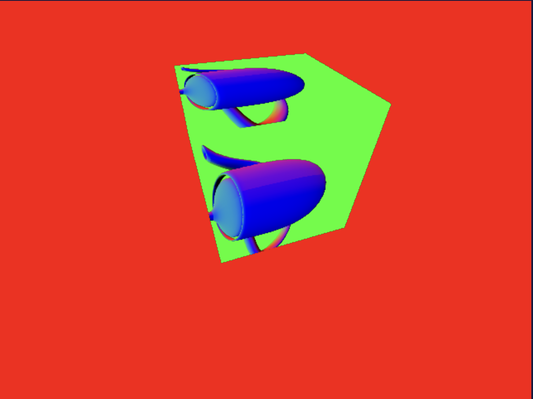
플레이그라운드 실행 - 2_00_render_to_textures이 튜토리얼에서는 "텍스처에 렌더링(render to texture)" 기법에 대해 설명할 것입니다. 이는 밉맵에 대한 이전 논의에서 유사점을 찾을 수 있는 개념입니다. 이 기법은 두 번의 렌더링 패스를 포함합니다. 첫 번째 패스에서는 텍스처 맵을 렌더 타겟으로 사용하여 3D 장면을 해당 텍스처 맵에 렌더링합니다. 두 번째 패스에서는 해당 텍스처 맵을 사용하여 다시 렌더링합니다. 이 접근 방식은 3D 장면에서 거울이나 동적 반사를 만드는 데 유용하며, 다른 응용 분야에도 사용됩니다.
이제 코드를 살펴보겠습니다. 이 예제에서는 두 개의 셰이더, 즉 `teapot_shader`와 `box_shader`를 사용하여 작업할 것입니다. 우리의 목표는 첫 번째 패스에서 회전하는 찻주전자를 텍스처 맵에 렌더링한 다음, 두 번째 렌더링 패스에서 그 텍스처를 큐브에 적용하는 것입니다.
이러한 객체들은 Teapot과 Box라는 두 개의 별도 클래스로 구성할 것입니다. 이전 예제들에서 이 클래스들을 접해 보셨을 것입니다. 간단하게, 전체 퐁 셰이딩을 적용하는 대신 찻주전자의 노멀만 렌더링할 것입니다.
const teapotTextureSize = 512;

const depthTextureForTeapotDesc = {
    size: [teapotTextureSize, teapotTextureSize, 1],
    dimension: '2d',
    format: 'depth24plus-stencil8',
    usage: GPUTextureUsage.RENDER_ATTACHMENT
};

let depthTextureForTeapot = device.createTexture(depthTextureForTeapotDesc);
let depthTextureViewForTeapot = depthTextureForTeapot.createView();

const depthAttachmentForTeapot = {
    view: depthTextureViewForTeapot,
    depthClearValue: 1,
    depthLoadOp: 'clear',
    depthStoreOp: 'store',
    stencilClearValue: 0,
    stencilLoadOp: 'clear',
    stencilStoreOp: 'store'
};
const colorTextureForTeapotDesc = {
    size: [teapotTextureSize, teapotTextureSize, 1],
    dimension: '2d',
    format: 'bgra8unorm',
    usage: GPUTextureUsage.RENDER_ATTACHMENT | GPUTextureUsage.TEXTURE_BINDING
};
let colorTextureForTeapot = device.createTexture(colorTextureForTeapotDesc);
파이프라인을 설정하기 위해, 우리는 512x512 픽셀 크기의 찻주전자 텍스처와 오클루전을 처리하기 위한 깊이 맵을 생성하는 것으로 시작합니다. 렌더링 목적으로, 이 타겟 텍스처 맵은 `RENDER_ATTACHMENT` 및 `TEXTURE_BINDING` 사용 플래그를 모두 지원해야 합니다.
다음으로, 이 두 텍스처를 활용하여 첫 번째 렌더 패스를 설정합니다:
let colorTextureForTeapotView = colorTextureForTeapot.createView();
let colorForTeapotAttachment = {
    view: colorTextureForTeapotView,
    clearValue: { r: 0, g: 1, b: 0, a: 1 },
    loadOp: 'clear',
    storeOp: 'store'
};

const renderPassForTeapotDesc = {
    colorAttachments: [colorForTeapotAttachment],
    depthStencilAttachment: depthAttachmentForTeapot
};
두 번째 렌더 패스의 경우, 이전과 마찬가지로 캔버스를 렌더 타겟으로 사용하여 구성할 것입니다.
const depthTextureDesc = {
    size: [canvas.width, canvas.height, 1],
    dimension: '2d',
    format: 'depth24plus-stencil8',
    usage: GPUTextureUsage.RENDER_ATTACHMENT
};

let depthTexture = device.createTexture(depthTextureDesc);
let depthTextureView = depthTexture.createView();

const depthAttachment = {
    view: depthTextureView,
    depthClearValue: 1,
    depthLoadOp: 'clear',
    depthStoreOp: 'store',
    stencilClearValue: 0,
    stencilLoadOp: 'clear',
    stencilStoreOp: 'store'
};
let colorTexture = context.getCurrentTexture();
let colorTextureView = colorTexture.createView();

let colorAttachment = {
    view: colorTextureView,
    clearValue: { r: 1, g: 0, b: 0, a: 1 },
    loadOp: 'clear',
    storeOp: 'store'
};

const renderPassDesc = {
    colorAttachments: [colorAttachment],
    depthStencilAttachment: depthAttachment
};
찻주전자의 회전은 렌더링 중에 발생합니다. 우리는 단순히 카메라의 위치를 z축 주위로 회전시킵니다. 지금까지 유니폼을 업데이트하는 방법에 대해서는 논의하지 않았습니다. 이전 튜토리얼에서는 유니폼이 프로그램 시작 시 한 번 생성되었고, 그 값은 일정하게 유지되었습니다. 그러나 카메라를 회전하려면 모델뷰 행렬과 파생된 노멀 행렬을 지속적으로 업데이트해야 합니다.
angle += 0.01;
let modelViewMatrix = glMatrix.mat4.lookAt(glMatrix.mat4.create(),
    glMatrix.vec3.fromValues(Math.cos(angle) * 15.0, Math.sin(angle) * 15.0, 15), glMatrix.vec3.fromValues(0, 0, 0), glMatrix.vec3.fromValues(0.0, 0.0, 1.0));

let modelViewMatrixUniformBufferUpdate = createGPUBuffer(device, modelViewMatrix, GPUBufferUsage.COPY_SRC);

let modelViewMatrixInverse = glMatrix.mat4.invert(glMatrix.mat4.create(), modelViewMatrix);

let normalMatrix = glMatrix.mat4.transpose(glMatrix.mat4.create(), modelViewMatrixInverse);

let normalMatrixUniformBufferUpdate = createGPUBuffer(device, normalMatrix, GPUBufferUsage.COPY_SRC);
commandEncoder.copyBufferToBuffer(modelViewMatrixUniformBufferUpdate, 0,
    modelViewMatrixUniformBuffer, 0, modelViewMatrix.byteLength);
commandEncoder.copyBufferToBuffer(normalMatrixUniformBufferUpdate, 0,
    normalMatrixUniformBuffer, 0, normalMatrix.byteLength);
await device.queue.onSubmittedWorkDone();

modelViewMatrixUniformBufferUpdate.destroy();
normalMatrixUniformBufferUpdate.destroy();
위 코드 스니펫은 유니폼 버퍼가 업데이트되는 방법을 보여줍니다. 각 프레임마다 업데이트된 내용으로 두 개의 스테이징 버퍼를 생성합니다. 하나는 모델뷰 행렬용이고 다른 하나는 노멀 행렬용입니다. 이 버퍼들에서 업데이트된 데이터를 복사할 것이므로 `COPY_SRC` 사용을 요청한다는 점에 유의하십시오. 실제 유니폼 버퍼의 경우, 데이터 복사의 대상이 되므로 `UNIFORM` 및 `COPY_DST` 사용을 모두 요청해야 합니다.
드로우 커맨드 형성 시작 시, `copyBufferToBuffer` 함수를 호출하여 데이터 복사를 수행합니다. 유니폼이 드로잉 전에 업데이트되도록 다른 드로우 커맨드들이 뒤따릅니다.
스테이징 버퍼를 해제하기 위해 `buffer.destroy()`를 호출하는 것이 중요합니다. 단, `onSubmittedWorkDone`을 호출한 후에 파괴되도록 해야 합니다. 이 함수는 우리가 두 버퍼를 해제하기 전에 렌더링이 완료되었는지 확인하기 위한 동기화 메커니즘으로 작동합니다.
let passEncoder = commandEncoder.beginRenderPass(renderPassForTeapotDesc);
passEncoder.setViewport(0, 0, teapotTextureSize, teapotTextureSize, 0, 1);
teapot.encode(passEncoder);
passEncoder.end();

passEncoder = commandEncoder.beginRenderPass(renderPassDesc);
passEncoder.setViewport(0, 0, canvas.width, canvas.height, 0, 1);
box.encode(passEncoder);
passEncoder.end();

device.queue.submit([commandEncoder.finish()]);
다음은 두 패스 렌더링 코드이며, 이는 하나의 제출을 구성합니다. 두 번째 패스는 첫 번째 패스가 완료된 후 실행됩니다. 그때쯤이면 텍스처 맵이 회전하는 찻주전자로 업데이트될 것입니다. 두 번째 패스에서는 찻주전자 텍스처를 큐브에 적용합니다.